Almost exactly one year after I bought my first telescope, the preparations for the construction of my permanent observatory started. If I had been told 12 months ago, I would not have believed it. Sure, you dream of it, but I did not think seriously about a realization. With the fixed pillar in the garden, I had already taken a big step in the summer of 2014 and wanted to see how far I get with it. Now I had the whole setup during the night on the pillar until the morning. Otherwise the long exposure times would not be possible. I then always went to bed when everything was running, but I really could not sleep very well. I always had a bad feeling because of the open equipment. Would I find anything in his place the next morning? Even the sleepy demontage after sunrise annoyed in the long run. The desire for a fixed observatory grew and grew.
In May 2015 therefore I began with preliminary considerations. WHERE could the hut in the garden be best? WHO builds it for me? WHAT does it cost? And the decisive: HOW do I convince my family?
The last I did first. It turned out to be easier than I thought, because I could argue that such a garden hut can also look quite nice and you could deposit beside the whole Astro stuff also a few garden equipment. Completely convinced my wife was, when she got the permission of the stands for the beams of the roll roof with Clematis or climbing roses to surmount ;-)
My Resources and Materials I listed here.

The Plan
After the family permission was issued, I made the following plan:
There must be electricity and network in the back garden part.
There will be a flat roof hut made of 45mm blocks as a kit, which I then modify. The dimensions will be 2.50m x 2.50m (more space is unfortunately not possible).
The pillar will be out of concret with a 250mm KG pipe (in order to save costs no further steel pillar). The 130mm steel pillar in the garden I also keep as an open-air pillar. For the Observatory I need an EQ8 mount adapter.
I need a heavy mount to be prepared for the future. With the EQ8 I have already laid the foundation.
The bushes, which are still at the planned location, must give way. The hut is then placed on a foundation of walkways.
Part 1: Electricity and network
On June 26, 2015, the electrician came and pulled a ground cable from my garage through a canal across the garden to the planned location. For this purpose a core drilling had to be placed through the garage wall and a piece of paving was to be crossed. After nearly three hours the electrician was able to finish part 1 of the preparations.
 Bay for the power and network cables
 Elektrician at work
 Cables and tins lie in the garage and wait for connection
Until it will go on, it takes a few weeks now. At the end of July, the bushes are removed, the foundation will be laid and the pillar concreted. Until the construction of the hut, I need again patience. The ordered hut has 10 weeks delivery time and is announced for early September. Mid-September, hopefully everything should stand and then start the work inside. The first light will probably be at the end of September.
20. July. Accessories are arriving
Today the concrete column adapter of JD-Astronomie came and the steel rolls of the company Bima for the roof construction. As the anticipation increases, the garden work is beginning next weekend.

25.-28. June, Foundation and Pillar
On a Saturday morning, my helpers came and removed the bushes and plants. Then the lawn was cut off and the 2.5m x 2.5m foundation was lifted. In the meantime, I prepared the pillar. I used a 250mm PVC pipe of 2.5m length, to which I screwed 6 wall-mounted sockets and laid inside pipes for the power cables. In addition, a steel reinforcement was installed to stabilize the column in the concrete foundation.
In the meantime the shelves were finished for the boundary of the foundation and a 50 x 50 cm pit with a depth of approx. 90 cm was lifted, into which we later concreted the pillar. Almost 400 kg of screed concrete were used. The column was then also filled with screed concrete and aligned as perfectly as possible perpendicularly.

At the end of the column filling, I lowered the EQ8 adapter plate into the fresh concrete with the 5 x 20 mm stainless steel stud bolts. I have previously figured out how high the pillar together with adapter plate should be at the end in the hut, so that I have a wall height of about 2.17m as min. horizon view. Obviously precision was also required when installing the adapter plate. The plate should be as horizontal as possible and the north pin for the EQ8 should point to the south (!). Subsequent corrections would be almost impossible.
Finally, the mineral based layer for the floor slabs was filled and solidified and the whole was slit smooth with plaster sand. The laid floor slabs do not have any direct contact with the pillar or the foundation to minimize vibrations. A test with the iPhone APP "Seismometer" revealed a good decoupling. Only by pounding on the laid ground plates minimal vibrations in the column were measurable.

The essential preliminary work was done. Now it's time to wait until the hut is arriving. The construction and roof modification is planned for the 19th of September.

19.-21. September - The construction begins as planned
On September 18th the hut was delivered on a huge pallet with a truck, which was very impressive for the neighbors. On the following day the construction work began. First only checking the parts, because my two helpers would not be able to work until the 20th. Except unpacking the pallet and checking the pre-assembled timber as well as preparing the hut construction on the slab foundation, I could do little alone by myself.

On Saturday, September 20th, it was raining in the morning cats and dogs and I saw the building plan already in danger. We first started in the garage with the shortening of the side walls for the later assembly of the two long running bars. When that was done, it was already at noon and it fortunately cleared up. The basic assembly in the garden could thus begin. Due to the pre-assembled side walls, it did not take an hour until the walls were secure.

Until now, it was still a standard structure of a garden hut, but now finally the constructive self-performance came into the series. Thanks to my brother-in-law (who also had a small mobile carpenter's office in the trunk), this was very helpfull. Here it was worthwhile that I had previously planned all the steps of the work and also made drawings. Toward evening of the first construction day the roof construction was already on rolls and ran like butter.

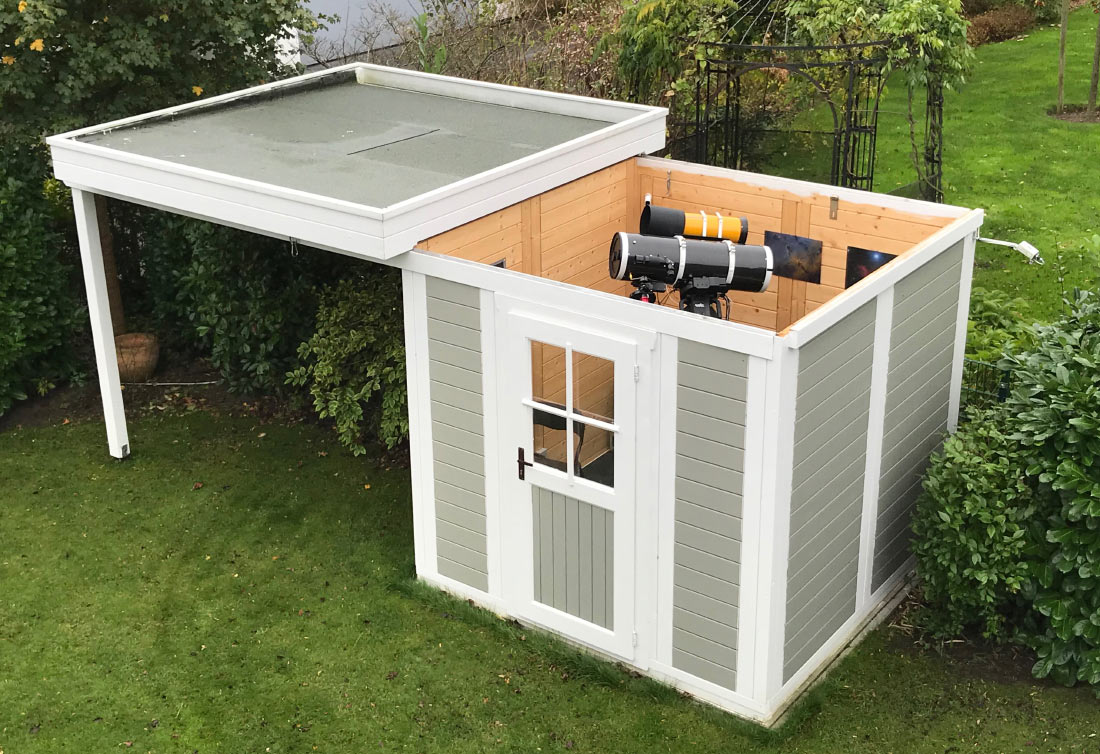
On the second set-up day, the roof was completed and covered with bitumen welding. In addition, the fine work for the rolling mechanism was carried out. Finally, the roof needs a "stop" mechanism against which it can run, not to fall down sideways. Last but not least, the floor came into the series and first exterior painting work. At the end of the Sunday, I was able to lock off the door of the finished observatory for the first time and start planning the interior design.

Firt roof opening
Two weeks later, everything is finished. The outer painting is done, the technique installed and first pictures have already been taken. Everything runs smoothly.

Address
Jens Zippel
c/o eWerk GmbH
Konsul-Smidt-Str. 24
28217 Bremen, Germany
Contacts
E-Mail: jens@spaceimages.de
Phone: +49 (0) 421 3351360
Disclaimer
Links
Me at Astrobin
Astronomicum Forum
Astronomie.de Forum
Astrotreff Forum
Balkonauten Forum
Österreichisches Astronomie Forum
Cloudynights Forum
Aladin
Olbersgesellschaft Bremen